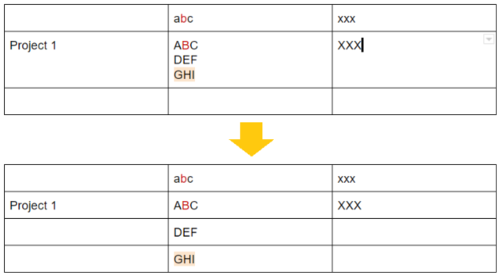
1 回答

TA貢獻1847條經驗 獲得超7個贊
我相信你的目標如下。
您希望使用 Google Apps 腳本將表格單元格轉換為問題中顯示的圖像。(下圖來自您的問題。)
為此,這個答案怎么樣?我想提出以下示例腳本來解決您的問題。該腳本的流程如下。
檢索表。
檢索表格的單元格“B2”。
這是來自您的示例圖像。
創建一個包含文本和文本樣式的對象。
這用于將值拆分到單元格。
文本和文本樣式設置為單元格。
當行數小于拆分值的行數時,將追加新行并將文本和文本樣式設置為單元格。
示例腳本:
請將以下腳本復制并粘貼到 Google 文檔的容器綁定腳本中,然后myFunction
在腳本編輯器中運行 的功能。在這個腳本中,row
和column
分別是行號和列號。因此,在您的圖像中,請設置row = 2
和column = 2
。例如,當您要拆分單元格“C3”時,請設置row = 3
和column = 3
。
function myFunction() {
// 1. Retrieve table.
const body = DocumentApp.getActiveDocument().getBody();
const table = body.getTables()[0];
// 2. Retrieve the cell "B2" of the table.
const row = 2; // Please set the row number.
const column = 2; // Please set the column number.
const cell = table.getCell(row - 1, column - 1);
// 3. Create an object including the text and text styles. This is used for splitting values to the cells.
const text = cell.editAsText();
let temp = [];
const textRuns = [].reduce.call(text.getText(), (ar, c, i, a) => {
if (c != "\n") temp.push({text: c, foregroundColor: text.getForegroundColor(i), backgroundColor: text.getBackgroundColor(i), textAlignment: text.getTextAlignment(i), italic: text.isItalic(i)});
if (c == "\n" || i == a.length - 1) {
ar.push({text: temp.reduce((s, {text}) => s += text, ""), styles: temp});
temp = [];
}
return ar;
}, []);
// 4. The text and text styles are set to the cells.
for (let i = row - 1; i < table.getNumRows(); i++) {
const t = table.getCell(i, column - 1).editAsText();
const run = textRuns.shift();
t.setText(run.text);
run.styles.forEach((r, j) => {
t.setBackgroundColor(j, j, r.backgroundColor);
t.setForegroundColor(j, j, r.foregroundColor);
t.setItalic(j, j, r.italic);
if (r.textAlignment) t.setTextAlignment(j, j, r.textAlignment);
});
}
// 5. When the number of rows are smaller than the number of rows of splitted values, the new rows are appended and the text and text styles are set to the cells.
while (textRuns.length > 0) {
const appendedRow = table.appendTableRow();
for (let i = 0; i < table.getRow(row - 1).getNumCells(); i++) {
appendedRow.appendTableCell("");
}
const t = appendedRow.getCell(column - 1).editAsText();
const run = textRuns.shift();
t.setText(run.text);
run.styles.forEach((r, j) => {
t.setBackgroundColor(j, j, r.backgroundColor);
t.setForegroundColor(j, j, r.foregroundColor);
t.setItalic(j, j, r.italic);
if (r.textAlignment) t.setTextAlignment(j, j, r.textAlignment);
});
}
}
結果:
當為您的初始表運行上述腳本時,可以獲得以下結果。在此演示中,首先展開單元格“B2”的值,然后展開單元格“C3”的值。
https://i.stack.imgur.com/jEwWK.gif
筆記:
此示例腳本是為上述情況準備的。如果您對上述圖像的規格進行了更改,則該腳本可能無法使用。所以請注意這一點。
在此示例腳本中,
BackgroundColor
和ForegroundColor
用作文本樣式。當您想使用其他文本樣式時,請修改上述腳本。
添加回答
舉報